Thursday 13 November 2014

It's in

Today with less than ideal conditions we put the boat in.


To launch it we put some wheels under the hulls and wheeled it down the ramp with it tied to a car to slow it down. Seemed a bit unconventional but it worked, but probably wouldn't want to do it that way on a bigger boat.


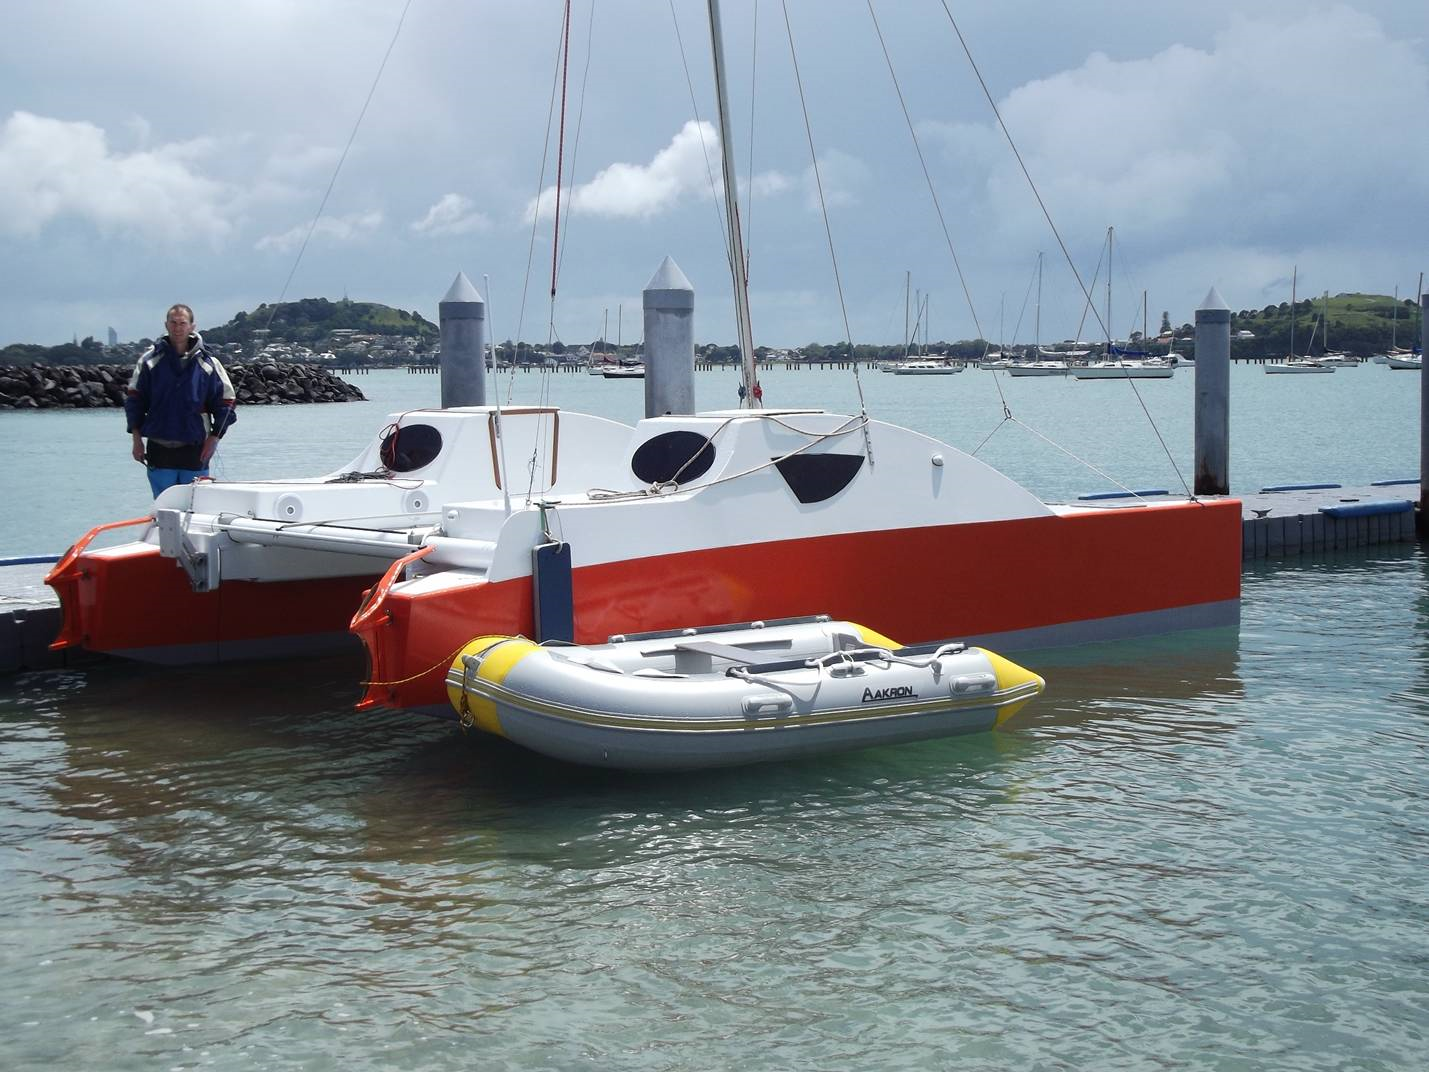
I have not sorted out sails yet, so it was a motor cruise for the first voyage. The 5Hp motor seems enough. Cruises around 6.5 knots, max speed 8 knots.

Still lots of small jobs to do, including sails, don't think I'll have enough money for new sails though. But I'm happy with how it is coming together.

Sunday 9 November 2014

Moving Day

Today the boat was moved near the water.


This was the first time I was able to properly see the boat, it takes some getting used to after all this time in the garage. The mast was temporarily raised to measure lengths and has since been lowered. Hopefully the boat will be launched within a week.
The day was a lot of hard work and this would not have been possible without the many helping hands giving up there time to help me. Thank you guys.

Saturday 25 October 2014

Tiller's

Here are some pictures of what I've been up to with the tiller's.

Here is the laser helping me line up the centre line.


Then based off the marked centre line I can work out the Ackerman angle for the tiller. The steel rule in the picture below shows the optimum angle for the boat.


Then I made the tillers to this angle. Much the same as how Hardy made the ones for his boat. These are PVC tubes wrapped in carbon uni at 0 degrees and then wrapped in carbon double bias. If I did it again I would probably use laminated wood as I would prefer the look of a constant curve to the tiller. I thought I could have a constant curve with the PVC but it was harder than I thought, hence the final resulting curve seen in the picture below.


I have been pushing myself a bit lately to get the boat ready hopefully for some sailing over summer holidays. As a result I haven't been taking as many photos for the blog as normal, but things are progressing for sure.

Looking back at the build so far, one thing that I wasn't quite expecting is that building the hulls was a much smaller part of the overall project than I initially thought.

Saturday 27 September 2014

Fitout rolls on

A few pics here of what has been happening with the fit out.

Here is one of the battery holders. These 7.2 Ah batteries are quite small but should be enough for what I need.

 
The picture below shows the finished depth transducer installation. It is mounted as an "in hull" transducer and hopefully will punch signals through the small section of solid GRP I made when constructing the hull. Also as you can see I have made a protective box to stop anything damaging or knocking the transducer off it's epoxy bed.


And here is where I have installed the display for the depth sounder. I chose this model for it's simplicity and low power consumption.


Obvious what is going on in this picture. The location for the porta poti is not as in the plans as this unit is a little to wide to be mounted at the forward location. But this spot is just as good. I made a raised removable floor for it to sit on. I had considered putting in a proper marine head, but recent changes to marine rules about discharge of waste made me think the extra cost and weight not worth it for my intended use, for now anyway.


I'm still enjoying working on the boat even after all this time. Though I've been putting in a few more hours lately as I hope to have it in the water for summer holidays :)

Sunday 14 September 2014

VHF

It is nice to be doing a few jobs that do not involve sanding or fibreglass. One of these jobs is installing a fixed VHF radio.

This picture shows where I have mounted it, in the starboard hull. I will be putting all electronics/switches for both hulls in this area so that they can be operated from outside by just leaning in to the cabin without having to go inside.


In this picture you can just see how I have made the hole for the cable. I drilled an oversize hole, then filled it with epoxy filler then drilled a smaller hole through the epoxy so hopefully this won't get water/rot problems later.


And here the aerial is fixed in position.


Wednesday 3 September 2014

Hatches

I have finally installed two of the first pieces of hardware I bought for the boat. The bow hatches.

First check they fit ok and mask around the edge. The sealant can get very messy if you're not careful.

 
Then the sealant is added.

 
Here it is, screwed in place and job done.


It is funny, I have heard this stage of a build seems to take longer than you think it will. And sure enough it does! I think the main thing is that the number of jobs on the "to do" list becomes massive compared to earlier in the build. The list was something like 3 things, build hulls, fibreglass hulls, paint. Now the list has at least 30 things on it!

Just like Bernd said, I think I have done 90%, so now I just need to do the last 90%. :)

Saturday 16 August 2014

Interior Lighting

I'm starting to work on the electrical system for the boat. I will try to keep things minimal while still allowing for some items to make cruising easier.

This small LED strip light will give plenty of light in the cabin. I am also happy with the mounting as it is designed for corner installation so takes up very little of the small space in there.


It is a good thing now with LED lighting using so little power I should be able to get by with small batteries. The plan is to have separate batteries and circuits in each hull with solar panels to keep them topped up.

Monday 4 August 2014

More on the Rudder Housings

Some more work here on preparing the rudder housings.

The process can be seen here for the mounting points to the gudgeon's, starting with plywood sandwiches shaped to fit the housing.


Then cut around the outside and glued in place.


Then wrapped up in a about 2 metres of 300 GSM carbon uni.


I have had to stop there for now on the housings as the boat will need to be moved forward to allow me to line up the gudgeon's on the housings. The transom of the port hull is hard up against a shelf in the garage so I'll continue with these once the boat is moved which I'll leave until later as once moved I have less space in the garage.

Saturday 19 July 2014

Cleats

I have fastened cleats at the four corners of the boat.
Here is the port bow cleat and fairlead.


I positioned the cleat forward enough so the hatch lid can open without touching it. Also the fairlead is hopefully positioned in a good spot where the anchor bridle won't interfere with the forestay bridle.

And here is where I have positioned the aft port cleat.


No surprises here really, though I thought about putting it on the lower area near the transom I thought the higher position suits me better.
It is a bit of a guessing game with things like this at the moment. Hopefully after getting out and using the boat, the choices I have made turn out to be ok.

Saturday 28 June 2014

Motor bracket

So I am finally getting around to bolting things on. Here you can see where I have positioned the bracket for the motor.


It is a standard "off the shelf" rise and fall bracket and the location here should allow me to get the motor on and off without too much trouble as I can more or less stand over it but obviously having the motor off the centre line is not ideal.

Weather has been pretty miserable in Auckland lately, I'm kind of happy the boat is safe and sound inside at the moment.

Saturday 21 June 2014

Washboards

As commented on in an earlier post, I am using plywood for the washboards.


Here they are, in place with the trim almost finished. Also the sliding hatches also have their trim which fits over the top of the washboard.
I have been doing some prep work for the trampoline also but not much to show yet.

Sunday 25 May 2014

Bolted

A bit of a major step has been made here with the two hulls joined for the first time!


It was a lot of work getting all the measurements right twice and making sure I only had to drill holes and cut once. The platform feels pretty solid. Would be nice to put it in the water right now just to see how it floats, but I think I'll just press on with the fit out. :)

Wednesday 14 May 2014

Trim

Just a couple of latest progress pictures here of the trim around the hatches.


The pictures tell the story here. This mahogany might be the only exterior wood to remain unpainted on the boat.

Sunday 6 April 2014

Painted

Here are the latest progress pictures.


Freshly painted here prior to the non-skid going on.


And a shot here of the non-skid which was just applied and still wet in this photo.


It was good to have a nice dry spell of weather to do all the painting. The paint seemed to go on a little better than last time, and I got some better rollers which helped also.

Friday 14 March 2014

Made to measure

Time for the tricky business of getting the beams mounted. I don't think any amount of accurate measuring during construction could allow for the beams to simply slot in without some tweaking along the way. With the beams at almost 3.5 metres long, being only a millimetre out with the mounting points, would be a problem.

Since I have the hulls aligned exactly, here is some of the process I have been going through to get the beams precisely located.

Good old laser level lined up with the centre location.


Easy to see where the cuts need to be made, before gluing the mounts in place


One of the few times I resort to using a hand tool here. With the other beam holders I used a scroll saw to cut them out. Anyway this little coping saw was surprisingly quick at getting through the Mahogany.


Here is the aft beam, checking clearances before epoxy bedding.


And here is the beam in place with the epoxy mixture setting.


So the beams now rest nice and snug in their mounts.

Sunday 2 March 2014

It's actually this big.

Here it is with the hulls at the correct spacing, showing how big the boat really is. Too big for this photo even. The starboard bow has to go on the other side of a pillar in my garage.


In the photo I am part way through making fine adjustments to the position of the starboard hull, once again the laser level comes into it's own here to help me get the two hulls as close to parallel as possible before I finish the beam mounts.

Wednesday 5 February 2014

Fairing + Beams

Fairing is now complete for the starboard hull.

 
Also I now have both beams. As you can see in the picture below. One of these beams is not like the other. One is some aluminium section I managed to get hold of early on in the build. But when I tried to get more it proved difficult so I researched other options and settled on a carbon fibre section made locally, it is still wrapped in plastic here, the finish is so nice I might just keep it wrapped up for a while. It is customised for the boat with extra reinforcing at the ends where the hull mounts are. It looks great and is much lighter than the alloy section. The alloy section is round, it looks a bit strange in the photo because I have cut an angle off at the end which will later allow securing to the beam mount.


Thursday 30 January 2014

Cabin 2 glassed and Hatch

The starboard cabin is now all glassed.
A few photos here showing the sequence.


Extra time taken here to get it all smooth is more than made up for by reducing the amount of fairing needed.


I did the cabin and decks in 4 stages. I have found working by myself it is best to do the glassing in smaller areas at a time.

Here also is the starboard hatch being enlarged. Made from two layers of ply with a curve as cut out from the roof, this one actually had a small amount of twist in it at the stage you see in the photo. What I did to fix it was when I put the fibreglass cloth on, while it was curing I supported the two corners that were low and placed weights on the corners that were high. I thought it was worth a shot and it paid off! the hatch now has no twist.


I'm getting low on Epoxy now, hopefully I have enough left to finish the boat. It will be close but it looks like I will have used very close to the designers estimated Epoxy amount by the time I'm finished.

Wednesday 22 January 2014

Back to the grind

After a short holiday break it is back to the grind here literally.

Again some hard work for the router swinging the big 50mm bit.


Here you can see the rather complicated looking aft beam area. I decided not to box it in. Instead I beefed it up a bit and went for an open style which seemed like a good idea at the time, mostly to match the port hull which is open to help with the outboard bracket. We'll see, it should make beam fastening a bit simpler at least.


The holes are all filled and faired.
Ready now for fibreglass.

Saturday 11 January 2014

The last panel

Making this boat is a bit like making a giant jigsaw puzzle where you make the pieces as you go. Here the last piece of the starboard hull has been made and put in place.

Simply showing the radius added to the edge.


And the finished panel.


Another big milestone is made. Both hulls are now structurally complete!
Still a bit to do to protect the wood and add some paint but a pretty good stage to be at.